Introduction to Site Analysis in Architecture
Site analysis in Architecture is a starting phase of architectural and urban design processes.
It is done basically to gather information on the climatic, geographical, historical, legal, and infrastructural context for a given plot or area.
Site Analysis can be defined as a process of surveying or analyzing the existing environment and how it will influence the structure’s design and layout on the site.
Site analysis in Architecture is a must to make a successful design.
It involves analyzing all features and advantages and making their use in your design.

Steps to do Site Analysis in Architecture
Step 1 : Survey (Data Collection)
Site Dimensions:
Evaluate the site dimensions setbacks and surrounding road widths, and pedestrian paths.
Vegetation:
Identify the vegetation on the site or outside the site which can affect the design. Collect the coordinates of trees on the site with the names of the species.

Constraints:
Identify the constraints on the site. For example: Is there any underground gas pipeline or water pipeline running through the site because it will affect the excavation process during construction. Or there are some species of trees that you can’t cut on the site you have either preserve it or move it to some other corner on the site
Local Norms and Restrictions:
Check the local norms like how much setback is necessary on the site. Is there any height restriction in the area due to nearby airports or anything similar?
Site Accessibility:
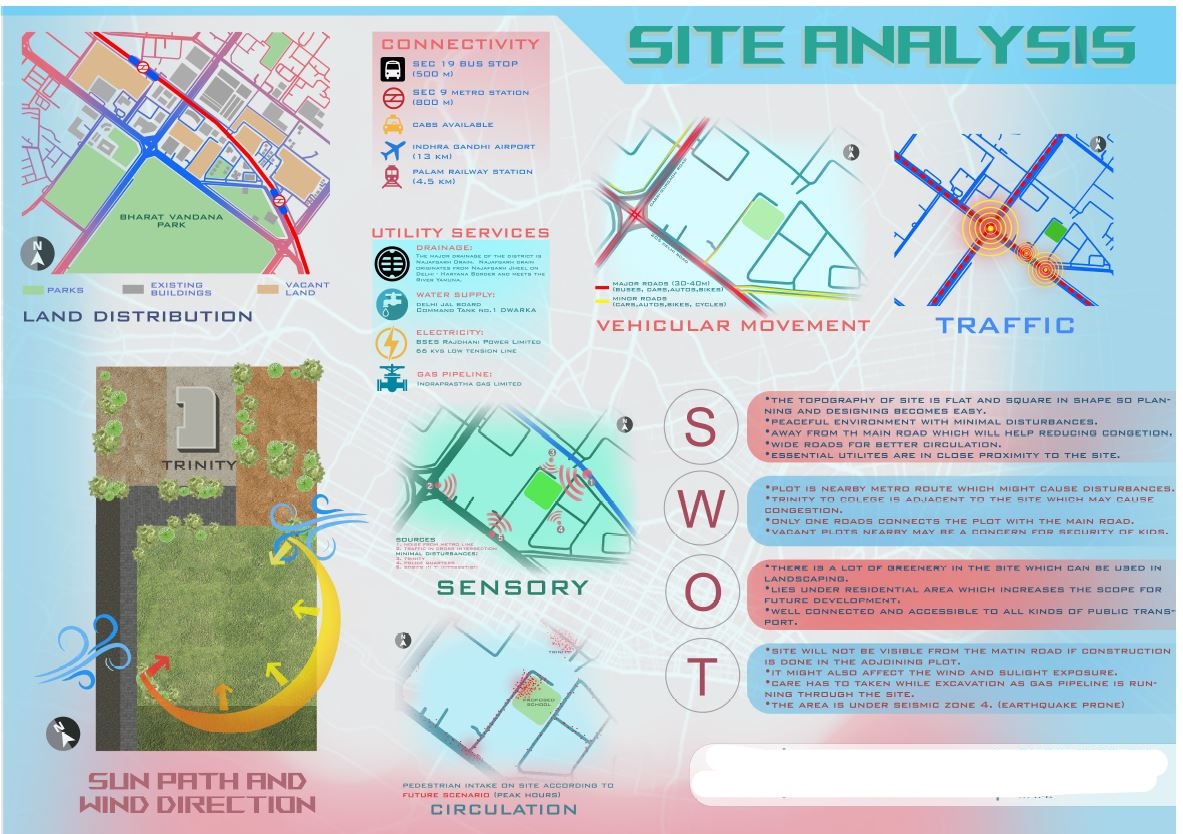
Calculate the distance from the near public transport stations to reach the site. Check if the site is connected to roads (from how many sides).
Site Surrounding:
Click pictures of the site surrounding buildings and areas. Note the height of nearby buildings which can block wind movement of can cast shadows on the site. Roughly the height of the nearby buildings can be found by counting the floors and considering each floor to be 3-4 m. Nearby areas such as garbage dump areas, drainage channels, transforms, and factories can affect the site.

Street Network:
Make the hierarchy of roads and streets to reach the site. Main Road, Secondary Road, Pedestrian path.
Traffic Density:
Check the density of traffic on the roads which are connected to the site. The density can vary with time during the whole day so you have to note the traffic density with the time.
Noise and Pollution:
Check if the site is free from any noise and pollution. If there is noise find out the source and note the intensity of its noise on the site. For example, noise sources can be nearby traffic on the road, Railway Station, or playground.
Architectural Style:
If it is found check the architectural style, materials or any vernacular architecture followed in that area. It will help in making better relations with the surrounding of the design.
The process of finding perfect png of trees, arrows, wind direction, sun path diagram, and many more can be very time-consuming and tedious. So we have done this for you. This is everything you need to craft an Effective, Informative, and Attractive Site Analysis.
Click the button below to get your Site Analysis Kit ⬇️
Step 2 : Analysis (Factors to be covered)
Internet Analysis of Site
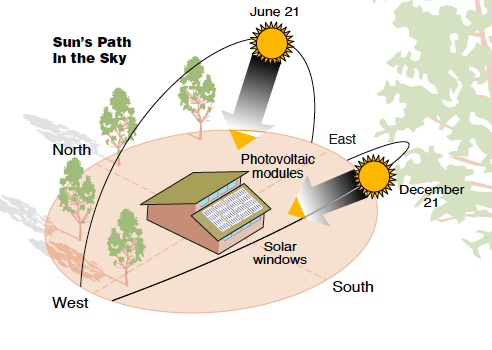
Sun Path:
Find the site on google earth and analyze the sun path on the site during summer and winters. During winters the sun path from east to west shifts towards the south direction.
Climate:
Analyze the site on different weather websites to collect the charts of temperature, Humidity, Rain in the area in past decades.
Wind Direction:
Find out the wind rose diagram of the area in which the site is located. Mark the prevailing wind direction on the site.

Urban Context of the site
Check the site surrounding the site on Google Maps and mark out the different uses of buildings. For example Residential Buildings, Commercial Buildings, and Institutional Buildings.
SWOT Analysis
Strength: These are the plus points or advantages of the site.
Weakness: These are the minus points or disadvantages of the site.
Opportunities: These are the factors or conditions on the sites which can be used to enhance the design of the building.
Threats: These are the limitations or dangers on the site which need to be overcome through the design.
Step 3: Pre-Design (Design Guidelines)
Now it’s time to summarize all the survey points and the analysis to draw out a basic design of the building.
This basic or pre-design will overcome the limitation of the site and make use of its advantages of the site.
In this pre-design, you will figure out,
The different pedestrian and vehicular entries can be made on the site.
The orientation of the building considers wind direction and sun motion.
The direction of the main facade of the building.
The concept of the design.


Links to help you collect data For your site:-
Sun 3D Path: http://andrewmarsh.com/apps/releases/sunpath3d.html
Weather and Climate: https//:weather-and-climate.com/
Sun Path on Map Solar: http://andrewmarsh.com/apps/releases/sunpath-on-map.html
Earth Sun: http://andrewmarsh.com/apps/releases/earthsun.html

You will get
- +110 Arrow png
- +30 Tree Plan png
- +25 Location Pins
- +20 North Pointers
- +15 Wind Arrow png
- +15 People Plan
- +10 Sun png
- Photoshop Pattern (Grass, Building Hatch 1-3)
- Sunpath Diagrams
- Different Vector Lines (Showing movement)

More Info:-
Pingback: SWOT Analysis in architecture - iarchitect.in
At last, someone wrote something very important about such a hot topic and it is very relevant nowadays.
I have been absent for some time, but nnow I remember why I used to love this blog.
Thanks, I’ll try and check back more often.
Spot on with this write-up, I truly think this website needs far more attention. I’ll probably be returning to read through more, thanks for the information!
I will definitely come back again.