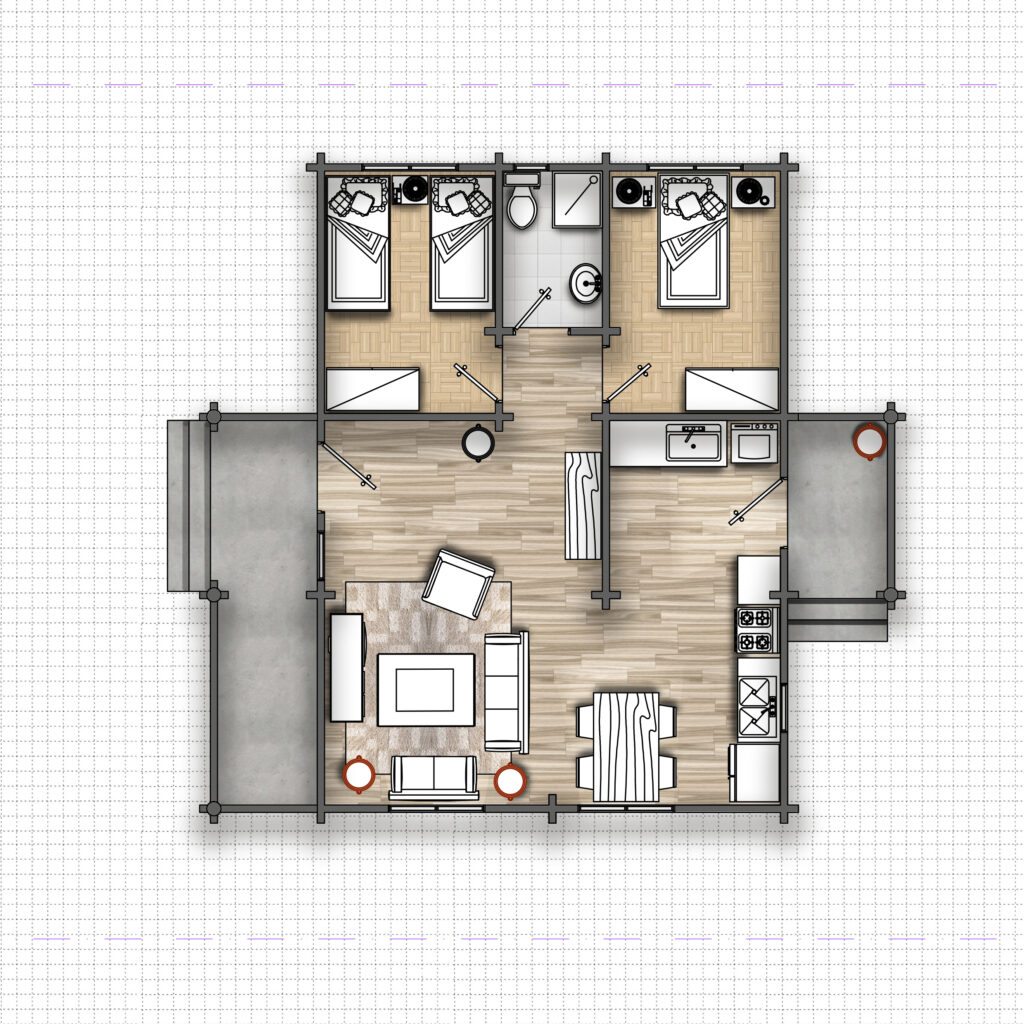
How to Render Plans in Photoshop
How to Render Plans in Photoshop? We are here to help you
To render a plan in Photoshop you do not need to learn full photoshop for it. You only need to know some tools of photoshop to produce an attractive and self-explaining plan.
Here I have discussed the tools of photoshop with you by giving an example of how to use them. How to Render Plans in Photoshop
You can practice and learn these tools on this plan by following this step-by-step process. After this, you will be ready to render any plan.
You can download the file from the link provided.
So let’s start

Step 1: Clean the autocad file
Remove the plants, people, and similar blocks from the AutoCAD plan. We will place rendered plants in photoshop.
Remove the annotation or arrows if present in the plan.
Make a line in door frames if they are open.
Now make a copy of the whole plan and make a box around it to specify the area which we will plot.
Now make three copies of this plan with the rectangle. Delete everything except walls, doors windows, and stairs from the 1st plan and delete everything from the 2nd plan except the furniture.
Use the Explode command to explode the 1st and 2nd plan 2-3 times so each and every line is separate. Now select all and take them to layer 0 and make line weight and color to by layer.
Now Plot both files separately so we have wall and furniture on two different PDFs.
Step 2: Import Files to Photoshop
Open photoshop and choose the desired page size.
Drag and drop both the pdf in photoshop without changing the size.
Rename the layers to “Wall” and “Furniture” and group them to a folder name as “Plans”.
Step 3: Apply flooring with Pattern overlay
Select the Layer with Wall pdf. Click on Magic Wand Tool and set tolerance to 5 and click on the floor of the room. The floor of the room will be selected.
Now click on the adjustment overlay at the bottom of the layer panel and select pattern overlay. Choose the pattern and adjust the scale of the pattern. ( How to Make Seamless Flooring Patterns in Photoshop )
Repeat this step and apply flooring in all the rooms.
Now to enhance the pattern you can apply layer style (Brightness/Contrast, Curves, Levels, etc) and clip them to the below layer by clicking between the two layers while holding alt.
Step 4: Make the shadows of Furniture
Since the furniture is transparent, we have to first fix this.
To fix this select the outside of the furniture with the magic wand in the furniture layer.
Now, right-click and click on, “select inverse”.
Make a new layer and fill this selection with white color and place the layer under the furniture layer, lets call this layer “furniture fill”. Now the inner part of the furniture is filled with white, the next step is to make shadows of the furniture.
Make a new layer and place it below the “furniture fill” layer.
Take a soft round brush with black color and make the shadow of the furniture according to the light coming from windows.
Now decrease the opacity of this shadow layer to make it realistic.
Step 5: Walls Shadow
Before making shadows of the walls. Select the internal of the walls by magic wand tool.
Now click on the adjustment overlay at the bottom of the layer panel and select solid overlay. Chose grey shade for the walls or any choice of color and set opacity accordingly.
Select the same layer and click on layer style at the bottom of the layer panel and select drop shadow.
Now do check the parameters to make the best shadow of the walls.
Normally:—- Distance: 40….. Spread:30…… Angle: 90 ….. Size: 92 ….. opacity: 30 works best for me.
Now, the photoshop render is almost done. You can enhance it by adding a grid background or grass background to the plan.
You can give the final touch to the render by pressing Ctrl+shift+Alt+E to merge all the layers to a new layer. Now press Ctrl+Shift+A to open the camera raw filter. Here you can adjust brightness, contrast, clarity, exposure, etc.
Your Final Photoshop Render Plan is Ready!
The above mention steps are simple and you can practice them with the file attached here.
In this practice file you will get a AutoCAD plan and photoshop flooring pattern to practice.
Click the button below to get your Practice File ⬇️